Tuesday 31 October 2017

Melted Fuse Box possible fix

I followed the following diy in order to solve the problem with the fuse box melting:

http://newbeetle.org/forums/1-8-liter-turbo/136562-melted-fusebox-findings-fix.html

I used 10 longer bolts, 5 nylon insert lock nuts and 10 split lock washers.

First seperate the two parts of the fuse box using a flathead screwdriver.


INSTALLATION:


Sunday 29 October 2017

Ground Wiring

I used about 2 meters of 4 gauge wire as in the following links (scroll down to find the tab ''ΣΥΝΟΔΕΥΤΙΚΑ ΑΡΧΕΙΑ''to see their specs):
wire

I built the following wires (length is not standard as there are different ways to do it):

Intake manifold to Right fender
Intake manifold to Valve cover 
Intake manifold to Central point (near FPR)
Central point (near FPR) to Tranny grounding point
Central point (near FPR) to Battery Negative
Battery Negative to left fender

Overview (not so clear)


After installing I noticed a slightly smoother operation of the engine (mostly on idle), slightly better radio reception and higher charging voltage (my Scangauge now saws 13.8-13.9 compared to 13.2-13.4 volts before). 


The tools I used and the crimping procedure I followed:


It was difficult to crimp by hand so I used a hammer to hit my crimping tool


The grounding points:


I used a new bolt for the tranny (the old one would not fit)


Grounding connections:


 I used sandpaper for the old connectors and the new grounding points.


Useful links and many thanks:


Saturday 19 April 2014

SWAY BAR LINK DIAGNOSE AND REPLACE 1J0 411 316D

Αν ακούτε ένα κλακ από την ανάρτηση, πιθανόν να ευθύνεται το μπαράκι ζαμφόρ. Προκειμένου να σιγουρευτούμε, περνάμε το αμάξι πάνω από ένα σαμαράκι. Πρώτα τη μία ρόδα και μετά και τις 2. Αν ακούγεται μόνο στην πρώτη περίπτωση, τότε το κλακ οφείλεται στη λειτουργία της αντιστρεπτικής.

If you hear a clicking-clunking from the front of your suspension, a faulty sway bar link might be the cause. In order to diagnose I passed the car over a road bump. First the one wheel and then both wheels simultaneously. If you only hear the clunk at the first case, then the clunk is caused by the operation of the anti-roll bar (sway link). 


Για να σιγουρευτούμε, αφαιρούμε τον τροχό.
In order to fully diagnose, remove the wheel. 

Έπειτα ξεβιδώνουμε το πάνω μέρος της μπάρας.
Then unbolt the upper part of the link.


Θα χρειαστεί να κρατήσετε κόντρα τη βίδα. 
You will have to counterhold the bolt.

Τραβήξτε έξω την μπάρα. Αν δεν βγαίνει ανασηκώστε την ανάρτηση με τον γρύλλο.
Pull the link. If it is stuck you might have to use the jack to push the suspension upwards.


Τώρα τραβήξτε την μπάρα πάνω κάτω για να εντοπίσετε το κλακ. Αν ναι, το κάτω μέρος έχει ζημιά. Κάντε το ίδιο και στο πάνω μέρος: ξαναβιδώστε το πάνω μέρος και αφαιρέστε το κάτω.
Αν έχετε σηκώσει και τους 2 τροχούς, αν η μπάρα που κουνάτε είναι εντάξει και η απέναντι όχι, πιθανόν να ακούσετε το κλακ στην απέναντι μεριά.
Now move the link up and down and try to notice a clunk. If so, the lower part is faulty. Do the same for the upper part. Re-bolt the upper part and remove the lower one. 
By the way, if you have jacked up both wheels, if the other link bar is faulty and this one is not, you will possibly hear the clunk at the other side.

Για επιβεβαίωση  κάντε τον παρακάτω έλεγχο.
Just for confirmation do this check after you remove the link.

Η μακριά βίδα της μπάρας πηγαίνει επάνω.
The link has one long and one short bolt. The short goes down.


Επανατοποθετήστε και ελέγξτε το αμάξι.
Re-install and test the car.

Sunday 30 March 2014

Top strut mounts replacement

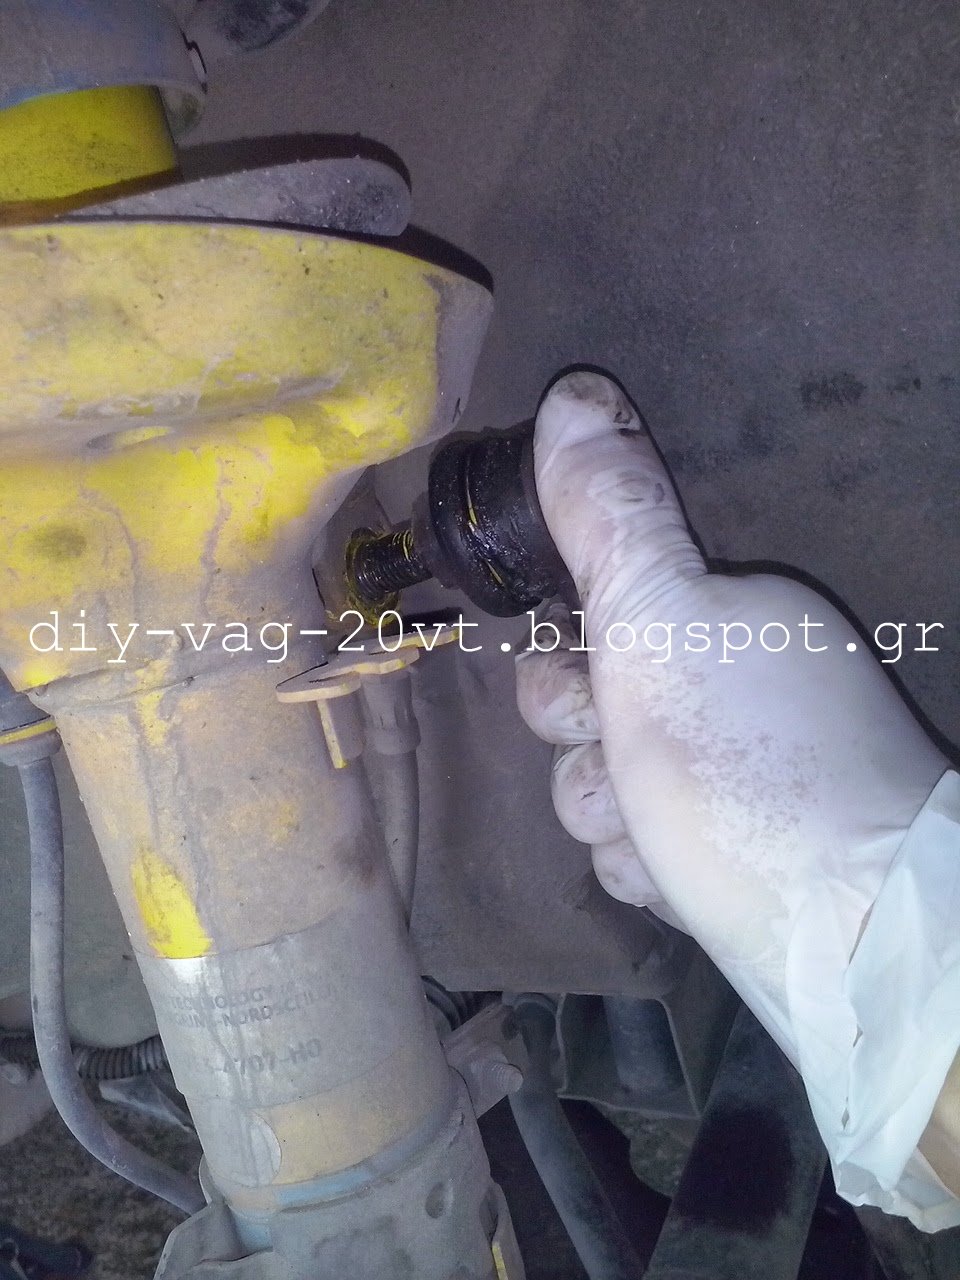
Το κενό στους θόλους είναι ένδειξη για αντικατάσταση top mounts.
The following gap means you have to replace the strut mounts.

Πέρα από τα εργαλεία, καλό θα ήταν να έχετε και συμπιεστές ελατηρίων. Δεν είναι απολύτως απαραίτητοι καθώς μπορούν να αλλαχθούν και χωρίς να συμπιεστούν τα ελατήρια.
Apart from the tools, you should better have spring compressors.

Τα καινούρια top mounts.
The new strut mounts.

 Σηκώστε το αμάξι και αφαιρέστε τον τροχό.
Lift the car and remove the wheel.


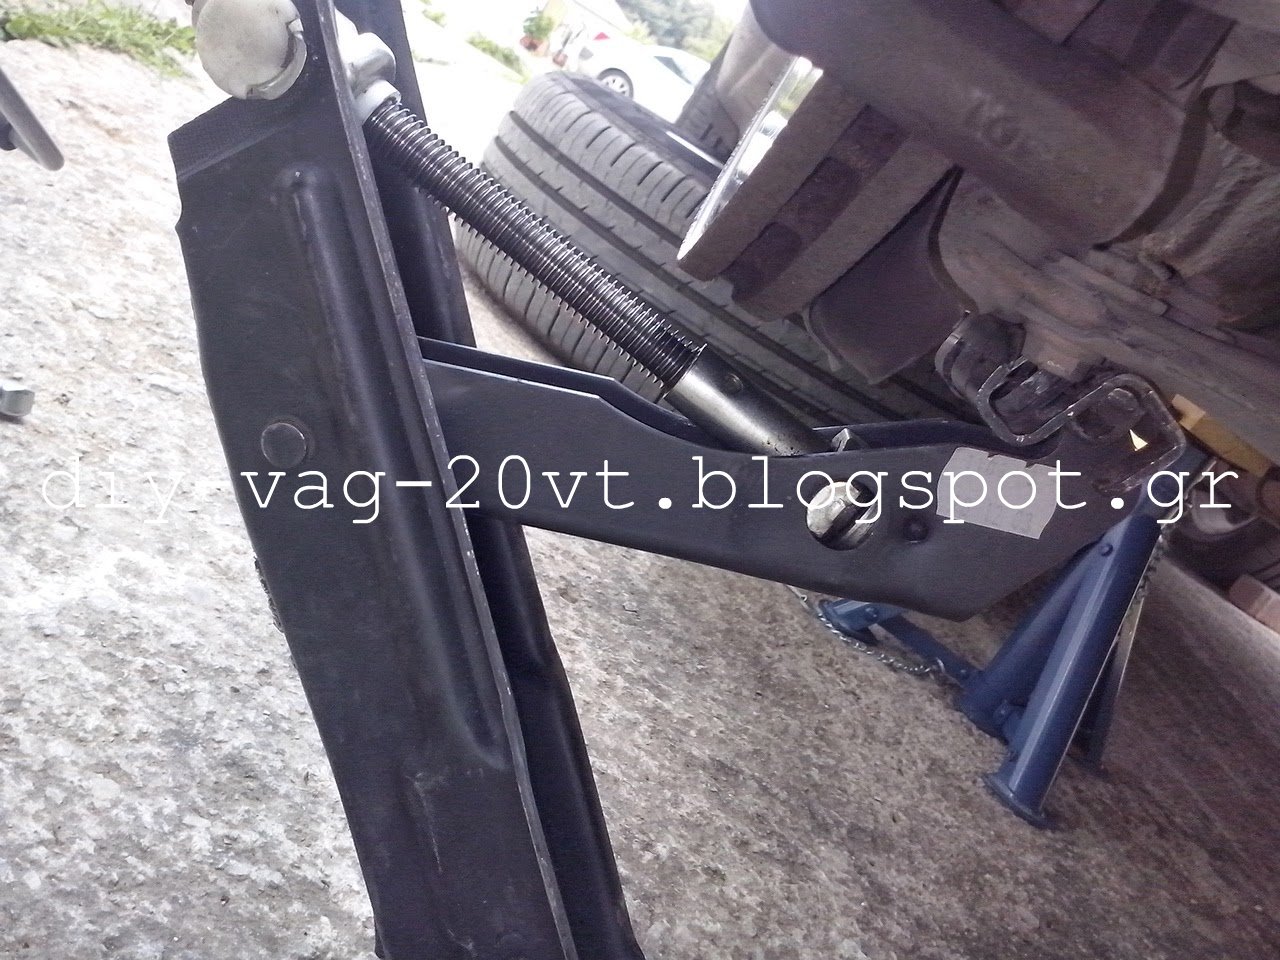
 Για να κατέβει το αμορτισέρ θα πρέπει να αφαιρέστε το ημίμπαρο.
In order to lower the suspension, you have to remove the coupling rod.


Χρησιμοποιήστε καρεδάκι 18 στο παξιμάδι και κόντρα γερμανικό 17 στο άλλο άκρο.
Use 18mm socket wrench for the nut and no 17 for the other end.


 Αφού αφαιρέσετε το παξιμάδι, τοποθετήστε τον γρύλλο κάτω από το ψαλίδι και ανασηκώστε ελαφρά μέχρι να αφαιρεθεί το ημίμπαρο.
After you remove the nut, place the jack underneath anf lift, until the rod comes out easily.


 Τοποθετήστε τους συμπιεστές ελατηρίων και συμπιέστε αρκετά ώστε το ελατήριο να περιστρέφεται.
Place the spring compressor and compress until the spring rotates freely.

ΜΕΓΑΛΗ ΠΡΟΣΟΧΗ ΣΤΗ ΧΡΗΣΗ ΤΩΝ ΣΥΜΠΙΕΣΤΩΝ. ΑΝ ΦΥΓΟΥΝ ΑΠΟ ΤΗ ΘΕΣΗ ΤΟΥΣ ΜΠΟΡΕΙ ΝΑ ΤΡΑΥΜΑΤΙΣΤΕΙΤΕ ΣΟΒΑΡΑ!!!!

BE VERY CAREFUL WHILE USING THE COMPRESSORS. IF THE SPRING EXPLODES YOU WILL SERIOUSLY INJURE YOURSELF!!!!!

 Με ένα κλειδί 22 και άλλεν Νο 7 για κόντρα αφαιρέστε το παξιμάδι και το καπάκι. Χρησιμοποιήστε τον γρύλλο για να στηρίξετε την ανάρτηση.
Use a No 22 wrenck and an allen No7 to remove the nut and the cap. Use the jack to support the suspension.


 Με καρεδάκι Νο 21 (αυτό που χρησιμοποιείται για την αφαίρεση μπουζί) αφαιρέστε το μέσα παξιμάδι.
Use a No 21 spark plug socket and the No7 allen to remove the inner nut.

Μετά αφαιρέστε το top mount και το ρουλεμάν του.  
Then remove the strut mount and the bearing. 
These are the old vs the new strut mount.

Χαμηλώστε τον γρύλλο και η ανάρτηση θα κατέβει.
Use the jack to lower the suspension.


Τοποθετήστε με την αντίστροφη φορά. Χρησιμοποιήστε λίγο γράσσο στο σημείο που πατάει το top mount. Για να καθήσει σωστά ανασηκώστε το αμορισέρ χρησιμοποιώντας τον γρύλλο.
Install in the reverse order. Apply some grease first at the point of contact. Use the jack to lift the suspension.